Start with a little, only 8x12 mm, rectangle. It is enough to show most of the pencil shading techniques, and not too large to slow down your work.
With such tiny paper areas you need 0.5mm mechanical pencil. I used simple Pentel Sharp P205 (a pencil of a good basic slim shape) with randomly selected leads. I don't like these though - they gave a dull pressure character and blunt working edge in a few movements. But we studying pencil shading tips now - not pencil selection tips. So for this task it is enough.
By the way, you can help a little while using too soft and cheap lead by constantly sharpening it against a paper. The same way as with a knife of not hard enough steel.
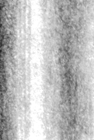
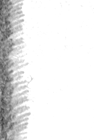
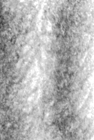
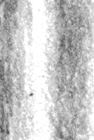
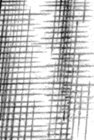
01
Vertical (parallel) pencil shading.
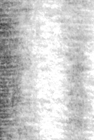
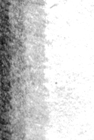
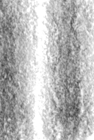
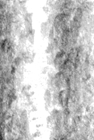
02
Horizontal (perpendicular) pencil shading.
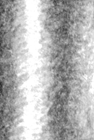
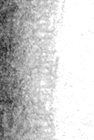
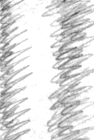
03
Tapered diagonal pencil shading. Raise your pencil lead's drawing edge to the end of the line.
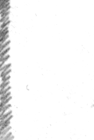
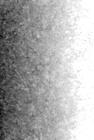
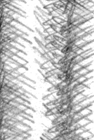
04
Soft cross-hatch shading. Common solution. Fast, simple, rough enough, giving good texture, well controlled chiaroscuro. All you need is to change direction of each pass a little.
You can see steps for it below.
05
Lazy soft curly shading. You can allow yourself not to raise pencil tip.
06
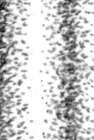
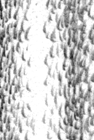
Sandy shading, stippling. Put dots with various stress. Try to start with soft-stressed dots to define common pattern and then continue to darken shades with hard-stressed dots.
07
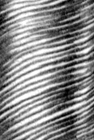
Curly, woodcarving shading.
08
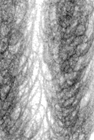
Now work with lead side instead of tip. Even vertical (parallel) shading. This is obviously smoother shading technique than usual one. You can see, how it enhance the texture of the paper itself.
09
The same shading technique, but with a shorter, abrupt strokes. More irregular.
10
Even more abrupt strokes. Still side of the lead but towards stippling technique.
11
Careless shading using sharp but still soft working edge. If you choose hard leads you can acheive this manner with more ease.